"Transform" of an object means three functions: position, rotation, and scale. Each function has three components—for X, Y, and Z. So transform contains 9 variables in total 3 defining each function. When you create a scene entity, its transform appears in the Channel Box. Here you will learn how to scale, rotate, and move your objects. Whenever you give a command in Maya to create an object, it is created using default transform which defines the position to be in the center of the scene at 0,0,0 coordinates, or origin.
In order to customize the object transform, you need to move, rotate, and scale the object to place it in the position you want. You can Move, scale, and rotate the primitive object into its final position either by direct manipulation or by entering numeric values through an editor.
You can also Duplicate the primitive objects to create multiple copies of the original or create different variations from your original primitive object.
When you create a new primitive in Maya, it becomes the selected object. In the Channel Box, you can access the object's creation parameters, the ones used most often to modify a new shape.
The ToolBox
In order to manipulate an object's transform, the basic tools required from the toolbox are select tool, lasso serves a similar purpose, move tool for changing the position of the object, rotate tool for changing the orientation of the object and the scale tool for changing the scale of the object.
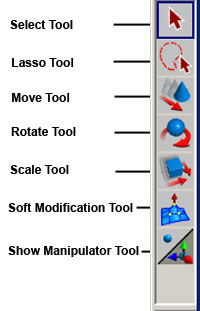
Fig2-1 The basic transform tools
Selecting Objects
There are many ways to select objects in Maya.
- You can select object individually.
- You can select all objects in the scene.
- You can select objects of a specified type.
- You can select objects of a specified name.
- You can select all objects in a set.
- You can select all objects in a display layer.
Inverting a Selection
Use Invert Selection to select all objects in the scene that are not selected. For example if you select two of five objects in a scene and then select Edit>Invert Selection, the other three objects are selected instead. This only works on objects not components.
To select all displayed objects
Select Edit > Select All
To deselect all objects
Click anywhere in the view.
Using Transforms
When you are in the Move (hotkey: w), Rotate (hotkey: e), or Scale (hotkey: r) mode, you have several options for transforming the object . Generally, if you click and drag on the surface of a selected object, or on the center point for the manipulator handles, you can freely move or rotate the object. In Scale mode, the object scales uniformly. You can also click and drag on any of the handles to have the action constrained to that axis.
The Move Tool
Click the Move Tool icon in the Tool Box and then select the object you want to move. Maya displays a manipulator with four handles-one to move along each axis and one to move anywhere with in the planes.
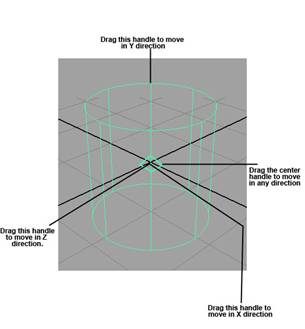
Fig2-2 The move tool
Click one of the handles, as indicated above. The selected handle changes color when active .The default color is yellow. If you double-click on the Tool Box icons for move, rotate, and scale, you get options for the tools (none appear for scale, but at least an empty dialog box appears). A useful option in this dialog box is snap spacing.
The Rotate Tool
It use the Rotate Tool to rotate objects about any or all three axes. Click the Rotate Tool icon in the Tool Box. Select the object you want to rotate. Maya displays a rotate manipulator consisting of four rings plus a virtual sphere enclosed by the rings or handles. The colors correspond to XYZ axes.
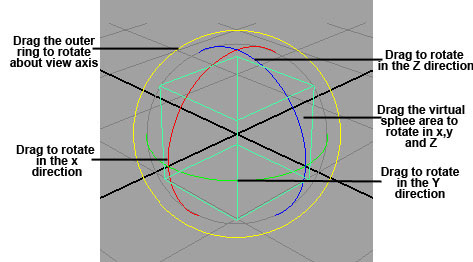
Fig2-3 The rotate tool
Click one of the handles, as indicated above. The selected handle changes color when active .The default color is yellow. Use the X, Y, Z rings to perform constrained rotations. Use the outer ring to rotate relative to the view.
When you rotate a component, Maya rotates it about a temporary pivot which is initially set to the center of the component's bounding box. In the rotate options, you can find the option to set snaps, which is helpful when you want to rotate objects in discrete increments. A good setting might be 15 degrees to make it easy to rotate objects to precise 30-, 45-, 60-, and 90-degree positions. Note that this snapping happens only when you use a manipulator's axis handle.
The Scale Tool
Use the Scale Tool to change the size of the objects by scaling proportionally in all three dimensions. You can also scale non- proportionally in one dimension at a time.
Click the Scale Tool icon in the Tool Box and select the object you want to scale. Maya displays a scale manipulator consisting of four handles. The color corresponds to XYZ axes.
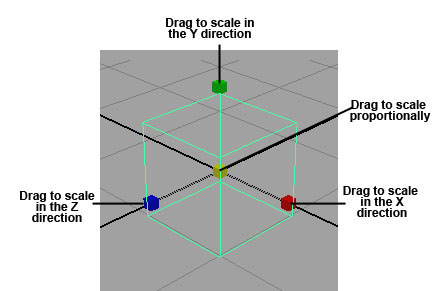
Fig2-4 The scale tool
Soft Modification Tool
This lets you push and pull geometry .By default, the amount of deformation is greatest at the center of the push/pull, and gradually falls off further away from the centre. However, you can control the falloff of the deformation to create various types of effects.
You can use this tool on NURBS surfaces, polygonal surfaces, subdivision surfaces, curves, particles or any object with components.
Show Manipulator Tool
This Tool lets you edit the construction history of an operation or the attributes of an object itself. This tool lets you access the input node of an object. A manipulator is a good way to access the history of a surface created with the construction history. Several manipulators can be active at one time.
Undoing and Redoing
Undo reverse the last action you performed on a selected object. This action transform an object to its original position.
Select Edit>Undo
Select Edit>Redo to perform the last action you reversed.
Duplicating Objects
Sometimes, you need to copy an object many times to create a complex object. Maya's object duplicator is under Edit > Duplicate on the menu. The default is to duplicate an object in place; you can do this with the hotkey Ctrl +d. The new duplicate appears by default exactly over the original object, so you normally follow a duplication with a transform.
Sometime, you want to create more than one duplicate. Use the Edit > Duplicate Option box to modify how duplicates are made.
Instancing
Another way to copy object is instancing. Maya redisplays the geometry being instanced. Since instances are not actual copies of the original geometry.
There are certain demerits of using instancing
- Instances share the same shader as the original geometry and can not be assigned as independent shaders.
- Instanced lights have no effect.
- When you create an instance of an already instanced node, Maya does not create a new level.
- Functions like extrude and insert can not be used on instanced items.
Snapping
The Snap options let you control an object or component's position by attaching it to a grid, point, curve or view plane. As you draw, rotate, resize or drag the objects ,it snap to the grid, point, curve or view plane.
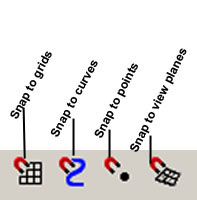
Fig2-5 Snapping options
Snap to grids
This option snaps a vertex or pivot point to a grid corner. If you select snap to grids before you create a curve, its vertices snap to the grid corners.
Snap to curves
This option snaps a vertex or pivot point to a curve or curve on surface.
Snap to points
This option snaps a vertex or pivot point to a point.
Snap to view planes
This option snaps a vertex or pivot point to a view plane.
Snapping hotkeys
x for grid snap
c for curve snap
v for point snap
How to use the grid Snap HotKey?
Select the object you want to snap and click the Move tool icon. Press and hold down the c key while click-dragging on the curve you want to snap with the middle mouse button.
Similarly you can use rest of the keys
Outliner
You can use outliner to examine the structure and components of the scene. It also displays shape nodes, connections and attributes. With the outliner you can make an object the child of a parent object. It selects and renames an object. Last but not least it reorder nodes.
To open the Outliner in the window
Select Window > Outliner
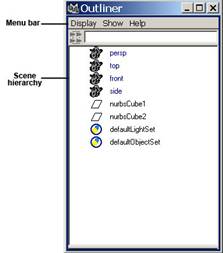
Fig2-6 The outliner
Grouping
Sometimes, you have groups of objects in your scene that are related to each other without being connected as a single entity. Any collection of objects can be selected and made into a group by choosing Edit>Group on the menu. Note that the objects are not tied up into this bundle; you can still select them independently. There's simply a new object that stands for the collection.
Parenting and Grouping
Parents and children in hierarchies work as follows: Where the parent goes, the child must follow, but the child is otherwise free to roam. The child objects can still be animated independently, however, without affecting the parent .With groups, the group node can be animated and all the members of the group follow the group node, but the group's members can still animate independently of the group. When you group several objects, Maya creates the group transform node, which can't be rendered.
You can directly assign hierarchical relationships to objects by selecting the child object(s), Shift-clicking to select the parent, and then choosing Edit >Parent (hotkey: p). Any transform applied to the parent is then reflected in the child. You can also break this bond by using Edit>Unparent (hotkey: Shift+P). This works only when the child object or objects are selected.
Channel Box
This is used to modify an object's attribute values. You can change multiple attribute values of multiple objects. It takes up less much less space in the window. With this you can control construction history. It appears in the Maya Window only it you choose to display it. The information displayed in the Channel Box varies, depending on what kind of object or component you have selected. If you haven't selected an object, the Channel Box region is blank.
In order to display the channel box
Turn on Display> UI Elements > Channel Box/Layer Editor.

3 comments:
Hai
You have shown good creativity and i really like it and so do others,actually we are also under the same business that is 3D Scientific Modelling url http://cattechnologies.com/3DMedical.aspx
please do have a look
hey, very nice site.thansk for sharing site
Dedicatedhosting4u provides reliable and robust dedicated servers with awesome internet connectivity. Company has Self Managed and Managed both option available for customers.
Reliable dedicated server
Cheapest dedicated
Post a Comment