Maya software Renderer

Render the scene using raytracing
Rendering a Still
Saturday, November 21, 2009
MAYA Tutorial - Rendering
The process of creating an image or sequence of images from a scene. During rendering, Maya generates a two-dimensional image, or series of images, from a specific view of a three-dimensional scene, and saves it as an image file.
You can control the properties of rendered image files according to your post-production or presentation requirements.
Maya's software renderer is an advanced, multi-threaded renderer. It is based on a rendering technology that is built directly into Maya's dependency graph architecture, which means its feature nodes can be intimately connected with any other feature in Maya. It is a hybrid renderer, offering true raytracing plus the speed advantages of a scan-line renderer.
The Maya software renderer supports all of the various entity types found within Maya including particles, various geometry and paint effects and fluid effects. It also has a robust API for the addition of customer-programmed effects.
Rendering an Animation
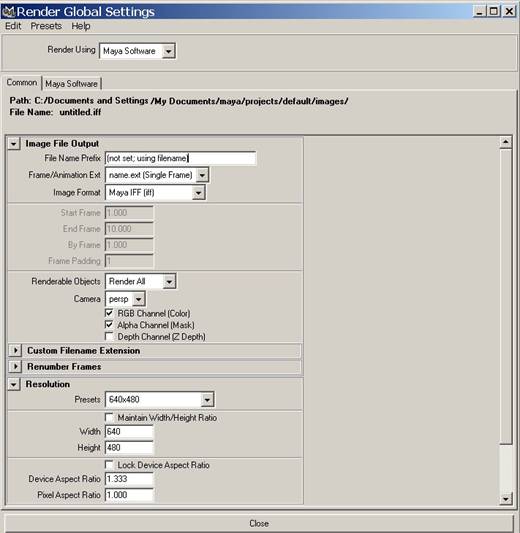
When you're ready to render a finished animation, open the Render Globals button on the Status Line, just to the right of the IPR Render button. You can also activate it with Hotbox >Window > Rendering Editors > Render Globals.Render Global Settings
Fig 9-1 Render Globals
You can select the Maya Software (or standard) renderer, the Maya Hardware renderer, Mental Ray, or the new Maya Vector renderer from Render Global Settings window. In all renderers, however, the information in the Common tab remains nearly the same. The settings for Start Frame, End Frame, and By Frame are activated if you choose a movie file output format or a filename numbering extension for your saved files. A Frame Padding setting of 3 or 4 works for almost all situations. This setting determines how many digits are added to the end of the filename, so setting Frame Padding to 4, for example, results in files being numbered as filename.0001.TGA, filename.0002.TGA, and so forth.
The default animation render length is set to frames 1 through 10—a short animation.
The Resolution section is where you set the image size; you can use the Presets list box to choose from a range of resolutions. Most of your tests will be at a lower resolution, typically 320x240 or 640x480.
The second tab changes its name depending on what renderer you've selected. If the only renderer options you see are Maya's software and hardware renderers. The Anti-aliasing Quality setting has a big impact on rendering speed and image quality. Images that are poorly antialiased have a jagged appearance, particularly visible where different-colored objects overlap or in areas of high contrast.For tests, you'd select the Preview Quality setting in the Presets list box; for final rendering, use the Production Quality setting, and select the Gaussian or Quadratic B Spline Filter in the Multi-pixel Filtering section for smoother-looking images.
The Raytracing section is where you configure raytraced reflections, refractions, or shadows to appear in the rendering; it's disabled by default, so you need to expand that section to enable the options. Raytracing can also slow your rendering time dramatically. The numbers for the Reflections, Refractions, and Shadows attributes refer to the depth of raytracing—the number of bounces allowed for a ray. As the ray strikes reflective or refractive objects, it ricochets through the scene. If the number of bounces reaches the limit set here, no further raytracing is done, and the pixel is colored based on the contribution of the previous bounces added to black.
When you want to render a test frame, you simply activate the panel of the view you want, and click Hotbox > Render > Render Current Frame. The settings in the Render Global Settings window determine the resolution, ant aliasing, and raytracing, but only one frame renders, and it's saved as a temporary .iff (or whatever image format you've chosen as the default) file in the Images directory of your project. When the rendering is finished, you can save the rendered image to a permanent file by right-clicking on the Render View window and choosing File | Save Image in the Save dialog box that opens.
For images you have rendered and saved, you can view them with Maya's FCheck utility.
To cancel the render
Press Esc.Rendering Engines in Maya
Maya 5 has added new rendering engines called Mental Ray and the Vector renderer. You can access these new renderers plus the Maya software and hardware renderers in the Render Global Settings window. With these new rendering options, Maya can quickly produce cartoon or web-like media with the Vector renderer and photorealistic renders using Global Illumination or HDRI in Mental Ray.
Posted by Lucky at 12:03 PM
Labels: Rendering Tutorial
Subscribe to:
Post Comments (Atom)


1 comments:
Really Knowledgeable, such an useful post for me. It is fantastic for new learners and valuable for them.
Animation institutes in bangalore
Post a Comment