Maya user interface looks very complex at first. However, this large number of functions and the scope to add more functions to the user interface provides the real flexibility to the program. Other than the functions common for all the various aspects of a 3d graphics software application, there are set of functions dedicated to a more specific task like modeling, texturing, animation, rendering etc. The default Maya user interface can be divided into the following sections.
- Main Menu Bar
- Status Line
- Shelf
- Tool Box
- Workspace
- Panel Menus
- Time Slider
- Range Slider
- Command Line
- Help Line
- Channel box
- Layer editor
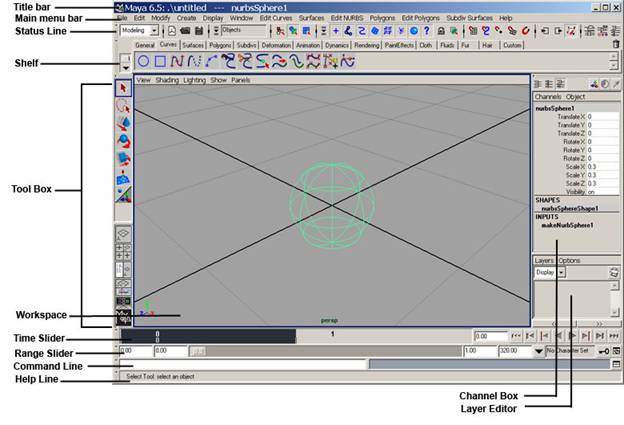 Fig 1-1 Maya User Interface
The Menu Bar
There are different menu sets in Maya that correspond to the more specific aspects of the application like Animation, Modeling, Dynamics, Rendering, cloth and Maya Live. The cloth and Maya Live are available with Maya unlimited version. These Menu sets can also be accessed using the hot keys F2, F3, F4 etc.
The menus in the menu sets behave similarly as a normal window menu. Other than the menu sets, there are common menus like File, Edit etc.
Any Menu item that has double lines over it can be dragged of the menu bar to create a min-toolbox so that the commonly used tools can float on the desktop.
You can hide or display different UI elements from the Menu item Display-> UI Elements.
Fig1-2 Menu Bar
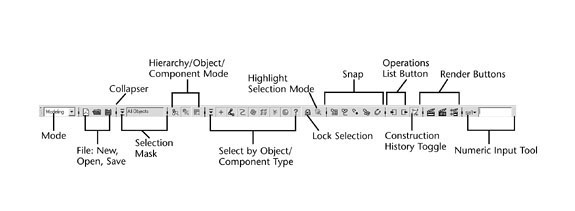
The Status Line
The commands available on the status line are mostly use for the purpose of modeling. On the extreme left we have mode selector that helps us to change modes between modeling, animation, rendering or dynamics etc.
A collapser is a clickable switch for hiding a section of the Status Line. Collapsers can be used to hide or display sections of the status line and adjust the number of available functions at an instance.
Fig1-3 Status Line
Selection Mask lets us select the masking preset so that certain types of objects can be ignored while making selections in a 3d panel. The icons to the right of the list box show the masking selections that have been made. The selection mask list box acts as a preset for the buttons in the Select by Type area farther to the right. These buttons correspond to Hierarchy, Object and Component mode. These functions can be used to select entire objects and mask the selection to pick only particular type of objects such as surfaces, lines, cameras etc.
Component Selection mode enables you to adjust subcomponents of an object, such as letting you select a certain portion of an object such as a box or a sphere and deform it. The hierarchy selection mode is used to select only the parent or only the children objects, this comes in handy when setting up object hierarchies.
A selection can be locked by pressing the Lock Selection button. This helps in avoiding accidentally de-selection of an object. Next is Highlight Selection Mode button, a toggle to highlight the selected object in the display.
We use snap tools to ease modeling and modifying objects by making it seem as though an object or part of an object is drawn toward another.
You use the Operations List buttons to view upstream and downstream connections and enable or disable them. Next is Construction History toggle and Maya uses this to record construction. History is not related to the Undo operation. Having Construction History enabled can make files large and slow to load, however, so you might opt to turn it off sometimes.
Next we have the Quick Render, Interactive Photorealistic Renderer(IPR) and Render Globals button. Quick Render and Interactive Photorealistic Renderer is used to render a scene at full quality. IPR rendering is slower, but when finished, it can update the rendering in nearly real time. Next is the Render Globals button, which controls the size of the rendering and many other parameters.
The last we have Numeric Input tool. It can operate in different types of modes. It is used to type in a prefix or common letters and select all the objects you want quickly, rename the currently selected object, and enter an exact value for the current highlighted transform.
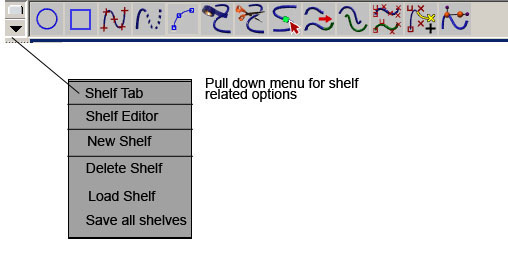
Shelf
Shelf contains different tools and commands. The shelf can be customized for one's specific needs. It is used to organize commonly used functions and tools into groups. You can create different shelves for different functions like modeling, animation, texturing etc with the required tools for each function.
Fig1-4 Shelf
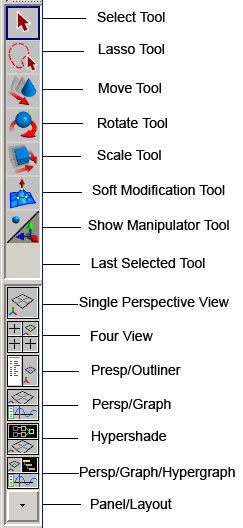
Tool Box
Maya Tool Box contains common tools as well as Layout buttons for changing views and layouts. The first one is the select tool. As the name explains itself, while this option is selected, you can use the mouse pointer to click over a particular object to select it. You can also click and drag over a number of objects to select them all together. The lasso tool is also used for selection in a way that you can draw a free hand border around the objects to be selected.
The move, rotate and scale tools are used for transforming objects in Maya. The soft modification tool is used to select the sub-object elements and modify them by moving, rotating or scaling in a way that the neighboring sub-objects also get affected by this deformation with the effect being an inverse of distance from the primary selected sub-objects.
Fig1-5 Toolbox
The last selected tool section shows the last used tool for easy access.
The single perspective view button lets you view the workspace as a single large view from a single perspective. The Four views can be used to view the workspace in four sections with each section containing the three orthographic views top, side and front and a perspective view respectively.
The other combination options below these tools are used to divide the workspace into different section in such a way that one section contains the view of the scene and other contains an animation or rendering editor so that you can edit the attributes and watch the results simultaneously.
Workspace
The Workspace displays by default in a perspective window or panel. The purpose of using workspace is to view your scene. You can display various editors and arrange the workspace panels in different layouts. The workspace can be divided into sections to accommodate the orthographic and perspective views of the scenes as well as the different editors for animation, texturing and rendering etc.
Time Slider and Range Slider
The Two Sliders are for controlling the frames in your animation. The Time Slider includes the playback buttons and the current time indicator. The Range slider includes start and end times and allows animators to focus on a specific part of the animation.
Fig1-6 Time slider and Range slider
Command Line
The command Line lets you enter the MEL (Maya embedded Language) commands to perform various functions. The MEL is a powerful feature of Maya that provides us with a vast flexibility and a scope to exploit the Maya tools beyond the user interface.
The left side is where you can type MEL commands and the right half displays system responses, error messages, and warnings. For a longer series of commands, use the Script Editor. The right side can also show echoes of all commands if you turn on Script> Echo All Commands from the Script Editor.
Fig1-7 Maya Command Line
Help Line
Like several other applications, you can look at the help line for descriptions, instructions, and other useful information. While a tool is selected, the helpline gives out a brief description for "how to" and "what for".
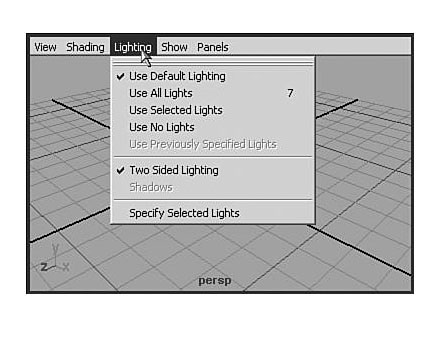
Panel Menus
Every view panel you work in has a common set of menus at the top. The panel menu that appears in a 3d scene, shown here with lighting menu selected. If the panel menus do not appear, you can enable them in Window> Settings/Preferences> Preferences, and then click the Interface entry under the Categories list on the left side of the dialog box.
Under the View menu, you'll see options for Look at Selected, Frame Selected, and Frame All. These options are helpful for finding an item and focusing on it.
Under the Shading menu, the first two entries are Wireframe (hotkey: 4) and Smooth Shade All (hotkey: 5).An important option to note is the NURBS detail mode. When you're working with NURBS, you can display them in three detail levels: low (hotkey: 1), medium (hotkey: 2), or high (hotkey: 3). These hotkeys work only with NURBS.
Fig1-8 Panel Menu
The Lighting menu has an option for using existing lights in the scene (hotkey: 7) with this panel's Shaded mode. Normally, Shaded mode is automatically illuminated (with "default lights") in a crude way that serves to get some light in the scene for viewing or rendering a new model.
Use the Show menu to selectively hide all entities of a certain type. For example, you often use it to hide cameras and lights, just to clean up the view so that you can focus on objects. At the bottom of this menu is an option to hide the grid, which is useful when you want to simplify the view.
Under the Panels menu, use the top three options to select what the panel is seeing in a 3D view.
The next three options let you change the entire layout of the panels. The Panel item displays options for switching the selected panel to some other window, such as a rendered view or the Graph Editor. Next is Layouts, which determines how the view area is split into windows. Below it is Saved Layouts, which is similar to the Quick Layout buttons below the toolbox.
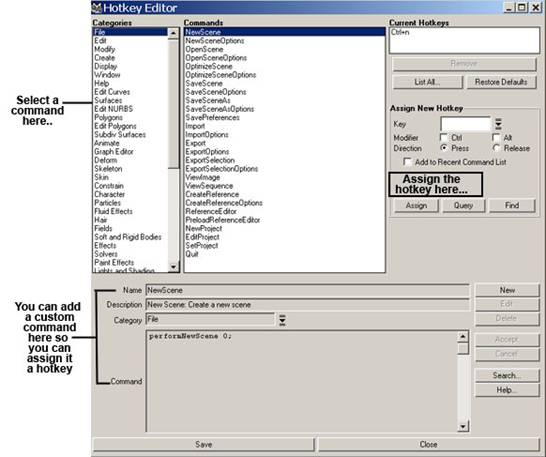
Hotkeys
Hotkeys are also known as keyboard shortcuts. There are several default hotkeys. You can change these hotkeys and assign new ones using the Hotkey editor by
- Selecting Window>Settings/Preferences>Hotkeys.
- Select the category and command,
- In the assign new Hotkey area, specify the key combination .You can see a list of which keys are unmapped by clicking List All.
Fig1-9 Hotkey Editor
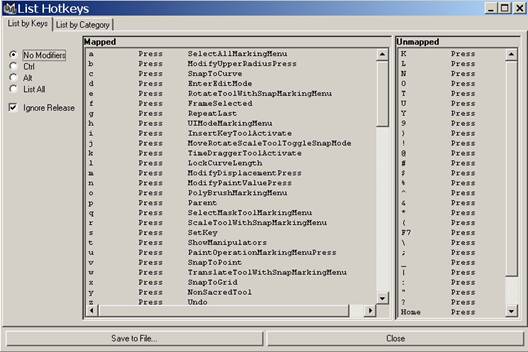
Viewing hotkey lists
Click List All to view a list of mapped and unmapped keys.
Fig1-10 Hotkeys reference
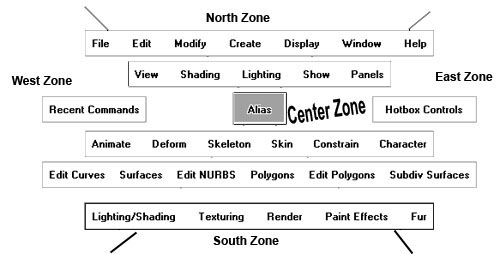
The Hotbox
Maya's Hotbox is a utility to get quickly to the menus that are available in the menu bar. It pops up when you press and hold spacebar. Once you customize the Hotbox, it provides quick access to the menus you use, hiding menus that are irrelevant to your work. It has five zones with special options. Five zones are North, South, East, West and center.
To see the entire Hotbox, click in the Hotbox Controls section on the right-hand side of the window, and drag your cursor over the Show All option. You might want to come back to this same Hotbox option and disable the Cloth and Live menus if you won't be using them.
Fig1-11 Hotbox
In order to disable the Hotbox, Select window>Settings/Preferences > Hotkeys. The Hotkey Editor window opens. From the editor window select Hotbox in the list of Categories. Select Show Hotbox from the list of commands, Select space from current Hotkeys, and then click on the Remove button. This turns off the hotkey functionality. Click the Save button and then the close button.